As an Amazon Associate, I can earn from qualifying purchases. Learn more.
In this guide, we’re going to look at how to install ZOSI security camera system around your home or store successfully. While it’s a pretty straightforward approach, we’ve come to realize some people tend to get stuck- most of the time with the progress bar at 80s%.
If you have the ZOSI 8CH security camera system (we’d believe other models too), your DVR may fail to complete the final setup stage when there are some firmware issues. But in this guide, we’ve included a quick fix that you apply when that happens. So, stick with us till the end.
What Type of ZOSI Security Camera System Do You Have?
After the initial debut, Zositech (or simply ZOSI) primarily dealt with extendable security camera systems with DVR. The technology was the most common in the early 2010s, anyways. But as years went by and more people start to upgrade from the BNC, the company also began to make wireless and PoE security camera systems.
The wireless security camera systems from the brand are still expandable options. And since they have their own built-in WiFi (P2P connection), you can efficiently use them in the farmhouse or any other area without internet.
How To Install ZOSI Security Camera System
In a nutshell, the best way how to install ZOSI security camera depends on the type of system you have. We’ll be focusing on BNC DVR kits since it’s what many people consider (from this company) because of affordability.
Meanwhile, as you possibly know, BNC security camera systems are usually not the friendliest to install. Be ready to do some extensive wiring and also a bit of drilling if you want to hide the security camera wires from plain sight.
Once you’ve received your ZOSI CCTV kit and yore ready to use, remove it from the box and make sure you have:
- High-definition security cameras
- BNC (coaxial) cables for camera
- 1-to-4 power splitter cable/s for camera
- Power supply adapter for the camera
- Power supply adapter for the recorder
- A wired optical mouse
- The DVR box (with preinstalled hard drive)
- Mounting hardware (screws, plugs, & manual guide
What You Need to Do Next:
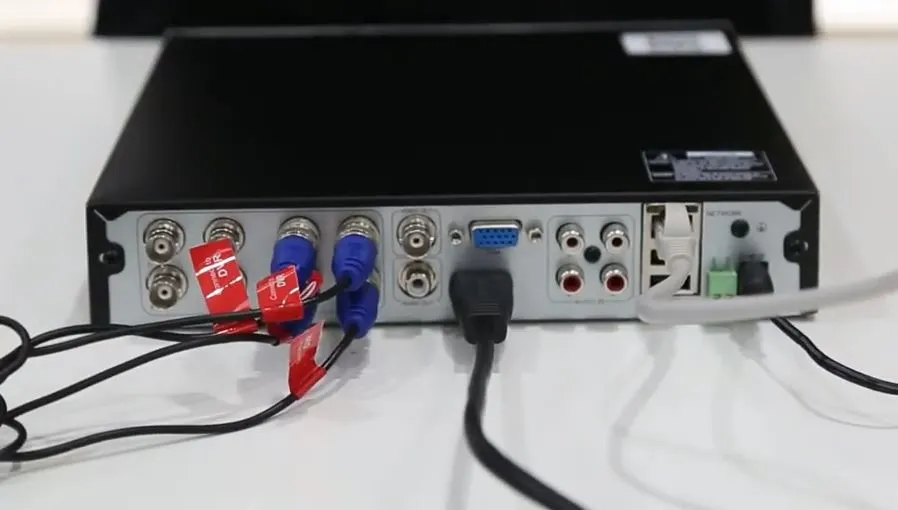
Part A: Connect the Cables to the ZOSI Security Camera
- Gather everything you need for the installation on the table
- Grab the 1-to-4 splitter cable and connect it to the power adapter for the camera
- Connect one of the splitter cables to the (Red) power end of the BNC cable. Then Plug the (Blue) video end of the BNC into the corresponding port on the recorder
- Next, connect the BNC cable you prepared in Step 3 to one of the cameras. Make sure you match the cables accordingly: Red to Red (for power) and Blue to Blue (for video).
- Repeat Steps (3) and (4) for all the security cameras you have. If you have the 8-channel and all the eight cameras, you’ll need another set of 1-to-4 splitter cables and a power adapter.
- Once done with that, connect all the other accessories to the recorder: mouse, monitor (use VGA/ HDMI cable), and power adapter for the recorder
- Now, plug the camera and recorder power adapters into the electrical outlet. The screen of your surveillance monitor will light up and start “system initialization”
Part B: Upgrade the ZOSI Recorder if Needed
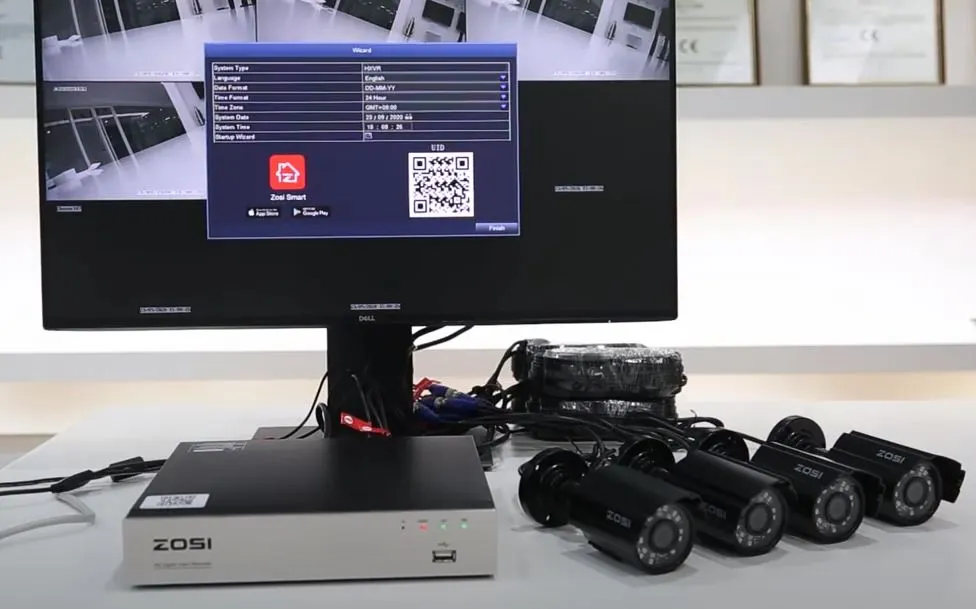
Once the DVR has powered up fully, your screen should show a live view of all the connected cameras. If the “system initialization” fails to complete, chances are that the firmware is outdated and needs refreshing. And to upgrade it:
- Visit the ZOSI support page with your PC or Mac
- On the input search bar, enter the model of your DVR system, then download the latest “Upgrade” file available
- After the File downloads, copy it to the root directory of a stick (USB) drive. Make sure you format the drive before use
- Next, disconnect the power adapter and mouse from the recorder. Then insert the USB drive you have copied the upgrade file
- Now, plug the power back into the recorder. The system will start upgrading automatically. Wait for it to complete.
- Once the upgrade finishes, the recorder will automatically reboot and should complete the initial “System Initialization” this time.
- Disconnect the upgrade USB from the recorder and re-insert the mouse. Then follow the onscreen instructions to create a new password for your system (if interested).
Once your ZOSI security system has powered up, you check the various features on each camera to make sure they work. Start with image quality and night vision (test by making the room dark).
If the live video is alright, make sure the cameras are recording in the proper settings too. Open the Main Menu, then go to Setup>> Record to check the resolution/ frame rate (check under the Recording Quality Tab) and recording mode (check Recycle Record).
Part C: Install ZOSI Security to the Desired Location
If all the ZOSI cameras are working alright, it means your system is ready for installation. So, disconnect the cables, then:
- Go to the mounting location and drill three holes in the wall or soffit using the provided template disc
- Insert the screw plugs into the holes you’ve just drilled
- Next, place your camera in the mounting position. Make sure you align the camera screws with the plugs, then tighten them well
- Repeat Steps (15) through (17) for all the ZOSI security cameras, each in the desired position
- Once you have the cameras secured in place, reconnect the cables as we did earlier in Steps A (2) through (6)
Key Takeaway: How to Setup ZOSI IP Security Camera
Basically, all IP security cameras are straightforward to set up, and the ZOSI selections are no different.
If you have the IP PoE NVR system, it’s not a must for you to connect the cameras to the individual power adapter. The Cat6 Ethernet cable you use for data will also power up the cameras. Thus, you just need to connect it to the record and your system will start up right away. (Of course, you must connect the recorder to an adapter for power and monitor (using VGA/ HDMI).
In the case of the ZOSI Wireless NVR security camera system, the kit is usually plug-and-play as well. You just need to plug the cameras and recorder into their power adapter, then hook up the monitor via VGA or HDMI. When the initial “System Initialization” finishes, the cameras will automatically show on the screen.
Hook up to the Internet for Remote Access
In conclusion, that’s how to install the ZOSI security camera system around your home or small business. The steps are pretty straightforward for even the non-techies. But when working around BNC (or PoE) system, you may need an extra hand to help you in the wiring process.
One best thing to love about ZOSI security systems is that you necessarily don’t need the internet to use them. Even the wireless NVR usually has its own built-in Peer-to-peer (P2P) WiFi that connects cameras automatically.
You only need to hook up the recorder to the internet for remote access. And to do that, connect the recorder to an Ethernet cable from your local router. Then, download the ZOSI Smart mobile app from the Google Play or App Store and follow the onscreen instructions to complete the configuration.