As an Amazon Associate, I can earn from qualifying purchases. Learn more.
While going wireless has a low cost of installation and maintenance, wired security cameras are the best for monitoring large properties. Not only are the cameras immune to interference but also you can watch the different angles of your compound from one control. If we can go with our subject, wired night owl security cameras, you can have a recorder that supports as many as 32 channels. This may be more than what you even need, and the best part is that you’ll never have to pay cloud subscriptions for any of them.
Is Night Owl A Good Security Camera System For Business?
For starters, Night Owl is not very old in the pitch of video surveillance. Of course, the company has been performing quite well in recent years but 2022 will be their 13th anniversary since the initial debut. That puts it like 22 and 16 years younger than Swann and Lorex Company respectively.
In any case, Night Owl offers their wired security cameras at a generous budget, which is one of the reasons many use them. The company also do have a few selections of 4-channel and 8-channel wireless security camera system, albeit not as liked as the wired category.
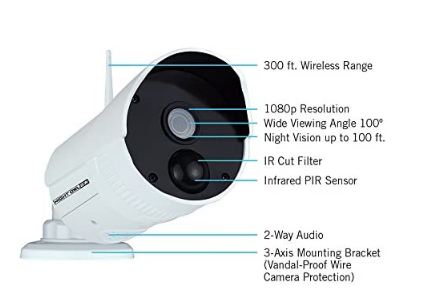
So, whether you want a CCTV system for your town office or suburban store, Night Owl can fit well in your list of potential brands. Many cameras are 1080p full HD resolution but you can also get 2k and even 4k Ultra-HD.
In the Night Owl vs Swann comparison review, we also highlighted some Night Owl cameras have facial recognition and human boy detection. So, we can say the tech is a bit better than Reolink security camera system which is yet to have smart AI intelligence.
Can Night Owl Security Cameras Work without WiFi
As we’ve mentioned several times, wired CCTV systems necessarily don’t need the internet to work. The cable that you connect from the DVR/ NVR to the cameras is responsible for the communication and sending pictures to your viewing device.
Therefore, if you’d prefer wired Night owl security cameras, you don’t need to have WiFi in your home or business. But then, you may want to know what’s happening on your property while you’re away, and remote viewing requires the use of the internet.
In addition to that, connecting your Night Owl DVR to the internet will allow the machine to automatically update to the latest software version. Otherwise, you’ll have to update your device manually, which is not only time-consuming but also you can easily miss out on an important upgrade. Therefore, even if you don’t want to connect your security cameras to the internet, you should do so for the startup process.
How to Install Night Owl Wired Security cameras
While it’s more reliable and convenient, a wired security camera system can have an involved setup than the wireless counterparts. You’ll need to have more tools for the installation, plus a day or two to finish the job.
However, PoE security cameras require only one cable to transmit the video, audio, and power. So, it’s a bit much simpler to put together than the analog CCTV that requires separate video and power wiring.
But, sadly, Night Owl isn’t much into PoE technology and many of the NVRs available are for wireless setup. Thus, we’ll use the latest Night Owl DVRDP2161 security camera system as the reference for our guide.
What You’ll Need
- DVRDP2161 recorder
- BNC Cable/s
- Power splitter
- Steel fish tape
- Masking tape
- Screwdrivers
- Power drill (optional)
- Monitor, mouse, and keyboard
- 1080p HD cameras (max 16 pieces)
- Mounting kit (from manufacturer)
-
Choose the mounting location for the cameras
This should be the first thing on your list, unless you’re doing all that for fun and not security. You’ll need to pick the place you want to have the additional eyes, as well as the position that’s easy to install but hard for intruders to access.
2. Assemble the necessary tools
The last thing you want is to start running the cables and mounting the cameras but realize the provider didn’t include all the brackets. So, bring together all the tools and accessories that you’re going to need for the whole process. The said mounting kit are items like screws, mounting brackets, and drill templates.
As for the power drill, it isn’t a must you use but can help ease the screwing, especially when dealing with concrete and bricks.
3. Test the performance of the Cameras
That’s right. Try all the cameras next to the DVR before you take them to the final location. This is to help confirm that everything is working as expected, including the image quality, night vision, and coverage. It can be very disappointing and frustrating to spend the whole day crawling in the attic, then realize some of the installed cables are faulty
4. Prepare the installation
Before you start running the cables, you must prepare the hub, path, and nest of your security camera system. The hub is where you’ll have the DVR recorder; the path is where you’ll run or hide security camera wires, and; the nest we can use for the camera location.
So, you can start by making the holes that you’ll feed the cables through, as well as those to secure the mounting brackets
5. Run the Cameras to the DRV Location
This one now depends on the path you have chosen for your security camera cabling. Usually, the ceiling is the best as you won’t have to disfigure your cute wall and it will be easier to hide from the prying eyes. If you got a steel fish tape, the process will even be much simpler and quicker. You’ll just have to feed the fish tape through the hole that you made for the camera, tape with the CCTV cable, then pull the fish tape from the outside.
6. Install the Cameras
Once you have all the cables to the individual camera positions, you can now connect them to the camera itself. Then, carefully push the excess back up into the hole. If you prefer, you can reinforce the camera cable connection with electrical tape to prevent it from getting unplugged by accident.
After that, you can now use the mounting screws and secure the camera to the house. Then, repeat this process for the rest of the cameras that you have planned to use.
7. Connect the Cameras to the DVR
Assuming you’ve already routed the other end of the cables through your house, this step should be straightforward and quick. You just have to plug each cable into its own port, then connect the HDMI cable to the viewing monitor.
Please note, the HDMI of the Night Owl DVRDP2161 recorder can only work with a minimum resolution of 1080p HD. If you notice the monitor displays a no signal image/s and all the cables are securely connected, chances are that the monitor is incompatible. But if you did the Step #3 testing, you should be having a 1080p monitor displaying all the connected cameras with a live view.
Conclusion
Well, that’s how you can successfully install night owl wired security cameras in your home or business. It’s not a difficult task if you have all the items in place and the right motivation to keeping your valuable possession safe. So, there’s no need to pay someone three hundred or six hundred to do something you can do yourself.
Meanwhile, Night owl wired security camera systems support multiple recording modes, namely event (motion-activated), scheduled, time-lapse, and continuous. So, while setting the time and password of the video management interface, remember to set the recording mode that suits your situation.