As an Amazon Associate, I can earn from qualifying purchases. Learn more.
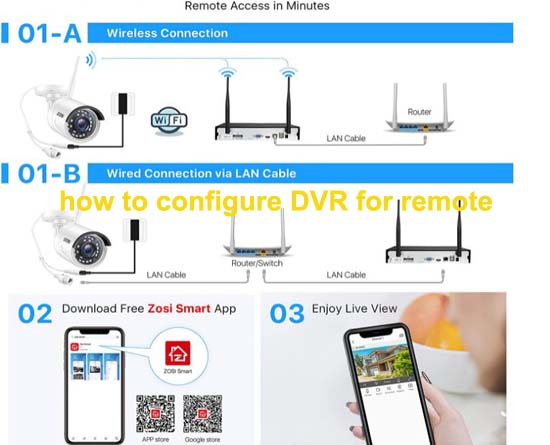
One of the many benefits of installing CCTV on your property is to see what usually happens when you’re not around. And if you know how to configure DVR for remote viewing, you can not only monitor your property while present but also when miles away.
Even so, DVRs are usually not like a security camera with remote viewing as the only means to access the footage. The recorder tends to have a port or two you can hook up your monitor or TV to locally stream the cameras. So, remote viewing is optional but, of course, crucial if you’d want to keep an eye on your property 24/7.
Long story short, this article will show you how to configure a security camera system with a DVR for remote viewing while at home and away. We’ll look at how to enable the feature on PC, as well as the mobile app.
What do You need to configure DVR for Remote Viewing?
As was just mentioned, a Security DVR systemhas simple local monitoring, which you can enjoy by just hooking up a monitor. However, the technique requires you behind this monitor 24/7, in which case it will be impossible while at work or a vacation. Hence, the purpose of configuring the system with internet for remote viewing. And to do that, you’ll need to have:
- A wired Router
- Ethernet cable
- Working internet
- Smartphone/ Tablet
- Laptop/ PC(optional)
- The IP address of your DVR
- Port forwarding setup
How to Configure DVR For Remote Viewing
Typically, configuring a DVR for remote viewing is both an easy and complicated process. Why do we say this?
Well, there are two main ways to remotely access a DVR system while away from the control room. The first method involves the use of the manufacturer’s cloud configuration, whereby you use your smartphone or tablet to scan the DVR’s QR code. Then, the second way involves port forwarding configuration, whereby you tweak the settings of your DVR and router to create a private bridge for the two to communicate while on an outside network.
The following’s a quick guide about the two methods, including how to enable them on your viewing device.
Method One: Configure DVR for Remote viewing through Cloud
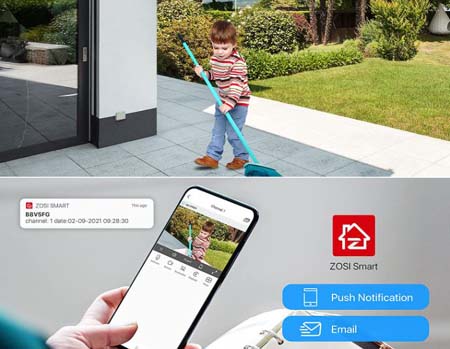
Overall, this is the simplest and most common way as you just need to scan a QR code embedded on the top or back of the DVR. You’ll find it with popular CCTV brands like ZOSI and Lorex that have their own mobile application, though others use apps from a third party.
It’s worth mentioning that DVR cloud configuration allows you to access cameras while at home or away. And the best part, you necessarily don’t need to bother with any of the network (firewall) improvisation. This is so as the DVR and the mobile app communicate with the cloud servers using what we call Peer Peer (P2P) technology.
Notes: P2P technology is common with branded systems as it’s something manufacturers integrate during production. We could say it’s more of a pre-configuration as you won’t need to change network settings like DDNS, port forwarding, or port mapping.
Anyway, here’s how to configure DVR for remote viewing through the cloud. In the method, we’ll use Lorex DVR for reference, but you’ll find the format pretty similar to other CCTV brands.
Directions:
In this setup, we’re assuming you have already hooked up your DVR to your router using an Ethernet cable.
- Download the Lorex Home app to your iPhone or Android device
- Launch the app and sign up with your preferred email and password. The password must be strong, with a combination of letters, numbers, and special characters
- Tap Add a device or the Plus (+) and scan the QR code on your DVR/ NVR using the rear camera of the mobile device. If the camera is unable to read the QR code, tap “Manually enter device ID”. Then, enter the numbers under the QR code
- When prompted, enter the login details of your DVR security system
- Finally, click “Done” and you’ll have your system appear on the Home screen. You can tap each channel or otherwise camera you want to start streaming
Method Two: Configure DVR for Remote Viewing through Port Forwarding
In this method, you should be able to configure any DVR for remote viewing. That includes even the non-branded models, considering the system does have client/ management software and web browser compatibility. Why is that?
For one, client software and browser usually don’t have built-in P2P technology as the mobile app). So you have to find a way to penetrate the network firewall if you’d like to remotely access the DVR on an outside network. In a nutshell, this penetration involves adjusting the settings of your DVR and router so as to create an opening for the two to communicate.
Just as the name, port forwarding, this opening works around some routing rules, whereby you create virtual ports on both the router and DVR. When you now request to view the cameras on an external IP address, the rules you have set on your router will forward the data packets to the DVR on its internal IP address.
If the DVR approves the request from the external connection, you should be able to view the video streams with no issues. If not, perhaps the set virtual ports don’t match, you won’t be able to access your cameras.
Note, you necessarily don’t need port forwarding to remotely access your DVR while at the location of the cameras. The setup is only crucial when away or using a different network from that of the DVR.
That said, here’s how to configure your DVR for remote viewing using port forwarding. We’ll still use Lorex as our example and also assume you’ve already hooked up your DVR to the router.
What You Need
- Router’s Gateway IP address: open the command prompt on your PC and type “ipconfig”
- IP address of the DVR: check under the network menu or system information. If it’s different from that of your router, do assign a new one such that the first three sets of numbers match
- Router login information (note, not the WiFi password): refer to your internet provider if necessary
- DVR Port number: listed under network menu alongside IP address
Directions:
- Login to your DVR and get its IP address as mentioned above
- Type the Gateway IP Address onto the URL of your browser and log into your router
- Locate the router’s port forwarding settings from the menu. Depending on the router brand, it can be listed as port forwarding, application and gaming, virtual ports, NAT, PAT, or Port Mapping.
- Under the menu you found on Step (3), assign a name for your port forwarding rule.
- Next, enter the port number that you collected earlier on the input boxes labeled External Port and Internal Port.
- After that, choose “Both” under the TCP/ UDP protocol and input the DVR IP address on the section for Device IP.
- Then, check the box on the far right to save and enable the forwarding rule you’ve just created.
At this point, your router’s port forwarding should have something like:
| Application Name | External Port | Internal Port | TCP/ UDP Protocol | Device IP# | Enable | |
| MyDVR | 3030 | 3030 | Both | 192.168.1.170 | Yes | Edit/ Delete |
| MyDVR2 | 8080 | 8080 | Both | 192.168.1.170 | Yes | Edit/ Delete |
| – | – | – | – | Edit/ Delete |
You should now be able to remotely view your DVR from any location, anytime while using the client software (MyDVR) or web browser (MyDVR2). Don’t worry, the router can handle the request for both ports with no issues.
As for the case of viewing your DVR on the browser, the format of the URL you use should be http://(IP address):(DVR port number). However, there are two key things to note here.
- To view the cameras remotely while using the same local network, you’ll use the IP address that you assigned for your DVR. If it’s our example above, that should be something like 192.168.1.170:8080. However…
- To view cameras remotely from an external connection, the IP address you use is WAN for the router. So, you can either check at What Is My IP Address or log in to your router and check the “WAN information”. Then, use the URL format http://(Wan IP):(DVR port number) to remotely access your DVR. For example, that should be something like 136.144.33.95:8080
In Conclusion:
If you have internet, it’s a great idea to connect your DVR unit to keep an eye on your property while even away. A lot of people are okay with using the mobile app but the article has also shown how to configure the DVR for remote viewing on the client software and web browser. So, you can now live stream on your laptop, PC, or even smart TV.
However, most of us have routers with a dynamic DNS, whereby the IP address change in case of a power blackout or the ISP rebooted the device. So, consider setting a static address or enabling DHCP to avoid losing access to your DVR while away.
In our opinion, though, creating a DHCP (dynamic host configuration protocol) on your router is more convenient and securer method.